When you get into a machine, an essential part of operating it is knowing how the controls and screens around you function. You have to be comfortable with the space around you.
To help you get comfortable and confident with the display screen on the Vermeer CC155 concrete cutter, this in-depth look explains how to navigate your way across the dashboard and show you the different screens and information you’ll need to access.
Basic navigation
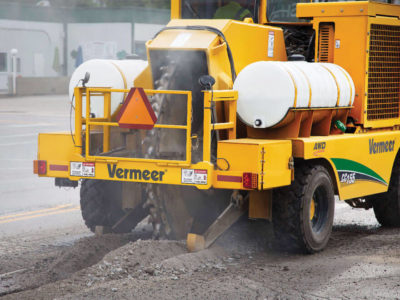
First, let’s review the different buttons on the main display. The buttons to the left and right of the display will change depending on what screen you’re on. Looking at the icons on the screen will help you understand what each button will do.
Let’s go through the buttons across the bottom, starting with the escape button, which has the “X” on it. Then you have your arrow buttons left, right, up and down. The button on the far right with the circle is the “OK” button.
Operator screen number one
Next, let’s talk about the different screens you can utilize.
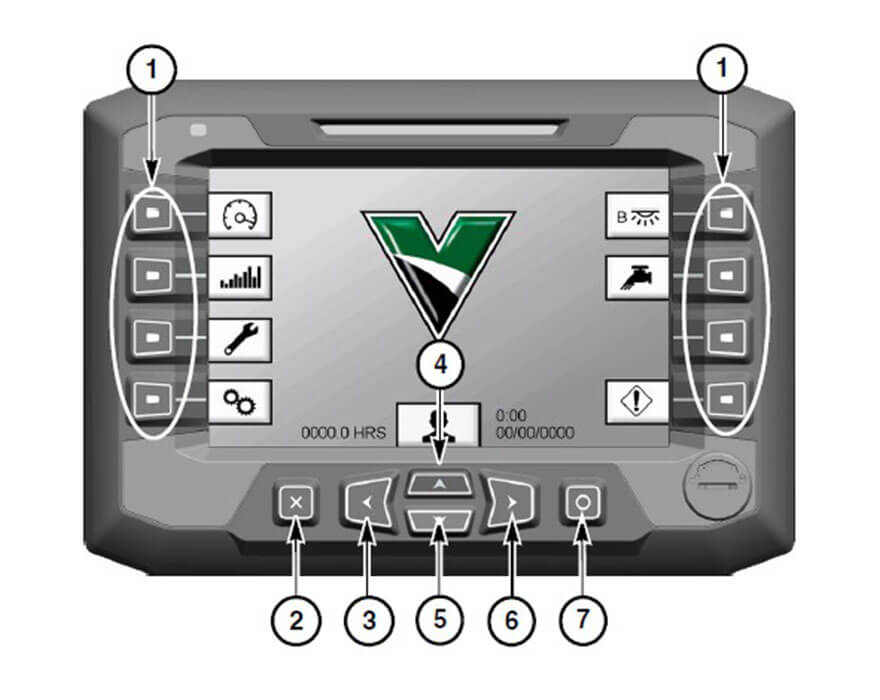
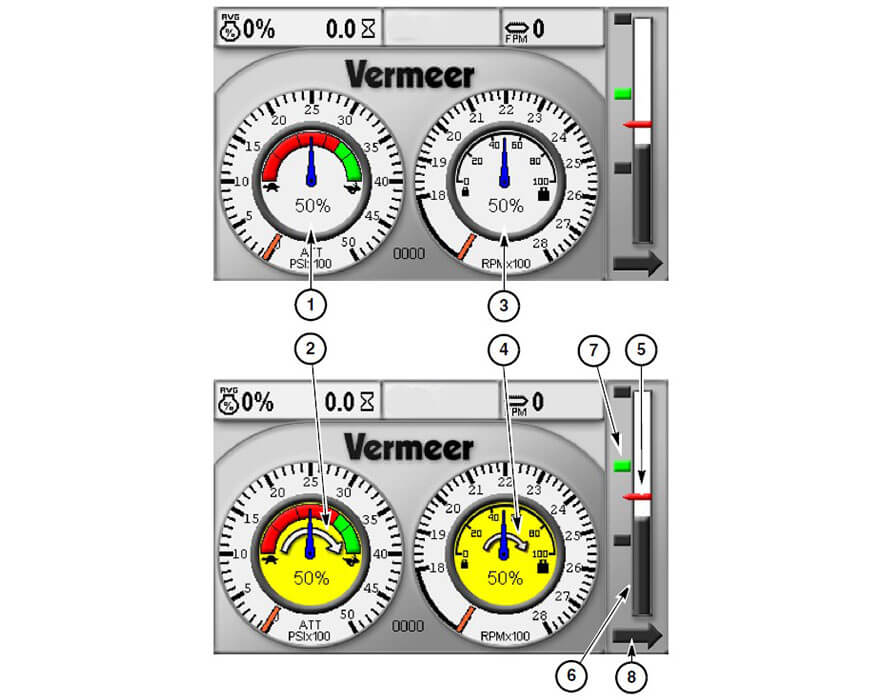
The first screen is referred to as “operator screen number one.” This shows you a variety of data and machine information that’s helpful to know while operating.
Information available on this screen includes:
- Average percent engine load display
- Ground speed
- Propel indicator
- Attachment pressure gauge
- Attachment drive percent
- Engine rpm gauge
- Live percent engine load
- Attachment knob percentage gauge
- Load knob percentage gauge
- Attachment icon and alerts
- Error alert
- Low fuel alert
- Exhaust system reminders
To access each of these settings, you can sort through them by using the navigational “arrow” buttons at the bottom of the display, which we discussed in the previous section.
Operator screen number two
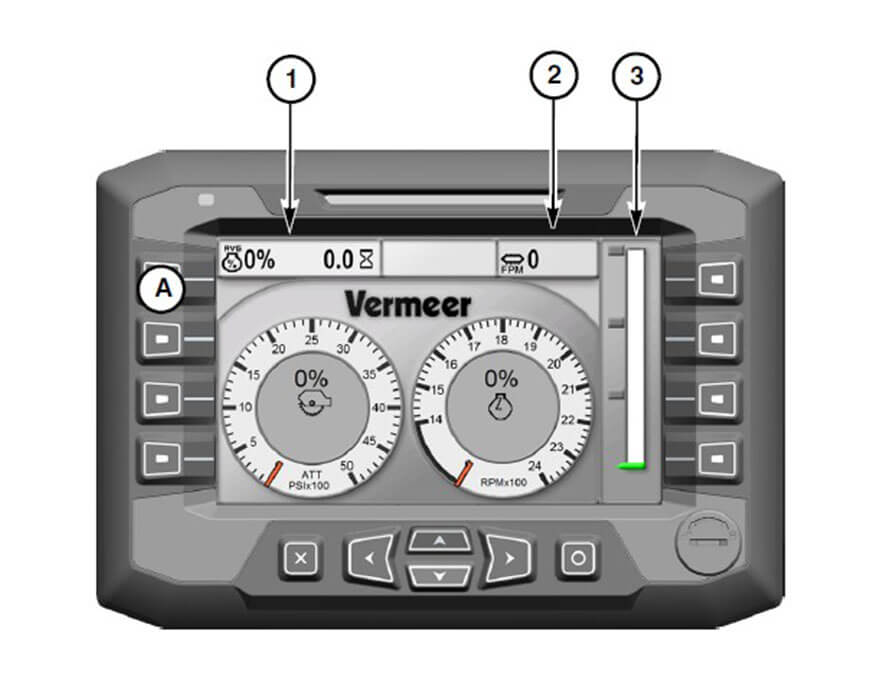
The next screen is referred to as “operator screen number two.” This is similar to the first operator screen but features different information and data on the machine. Some of the main data accessible on this screen include:
- Hydraulic oil temperature
- Fuel/DEF level gauge
- Battery voltage
- Coolant temperature
- Engine oil pressure
- Attachment charge pressure
- Air cleaner restriction gauge
To get to the operator screens, navigate to them by pressing the corresponding button or icon on the left or right side of the display.

Navigating through the different screens
The different buttons on the left and right take you to different screens. The top button on the left side takes you to operator screen number one. The second button shows you performance monitoring screens. The third pulls up the diagnostic screens. The fourth and last button on the left side will show you the settings screens.
On the right side, the top button lets you toggle between screen brightness levels. The next button below it will turn the water system on or off. The third button isn’t linked to anything, but the fourth button shows the error code screen. To view the operator login screen, press the “OK” button at the bottom.
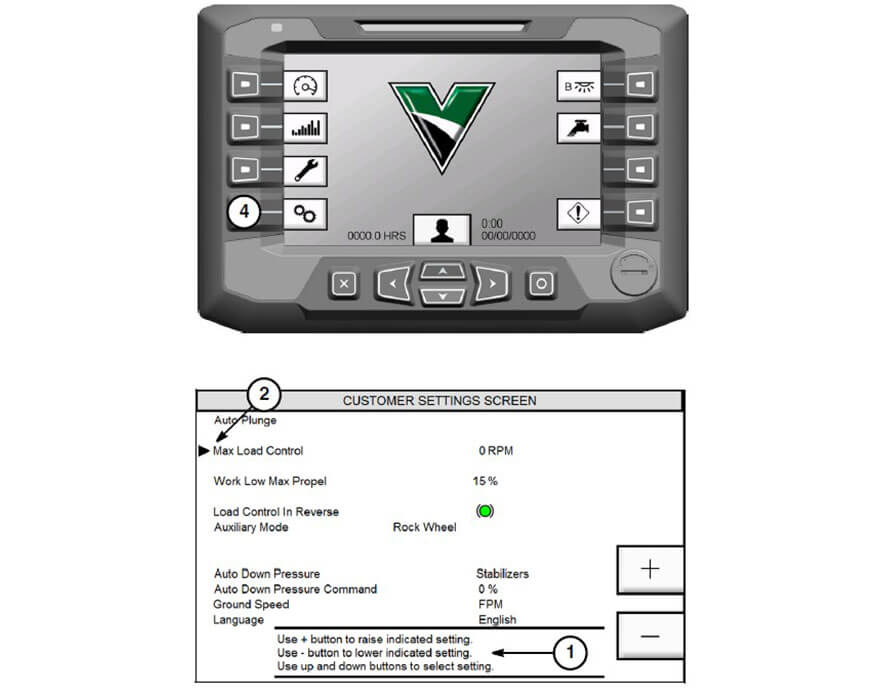
Customer settings screen
Another screen you can navigate to is the customer settings screen. Press the settings screen button on the bottom left of the display and you’ll see the customer settings menu. This is where you can select or change your machine settings, such as maximum load control, which is the amount the engine rpm can drop before the ground speed reduces.
You can also change the “work low maximum propel” percentage to affect maximum ground drive speed in response to cutting conditions.
Select an auxiliary mode option to alter the load control. The default setting for the auxiliary mode is the “rock wheel” setting and should not be changed. You can also choose stabilizers for auto down pressure and select the down pressure percentage by selecting auto down pressure command.
For your ground drive units of measure, you can select feet per minute, feet per hour, meters per minute, or miles per hour. You can also change your language here.
Performance operation screen
Next, let’s talk about the performance operation screen. This displays suggestions you can follow to aid operating efficiency. There are also screen icons that pop up prompting you to make adjustments to optimize operation. This screen allows you to view and adjust your attachment speed, load control and ground drive control.
We’ve tried to make this display screen convenient and intuitive for you to navigate through. If you have any questions, please contact your local dealer.
Vermeer Corporation reserves the right to make changes in engineering, design and specifications; add improvements; or discontinue manufacturing at any time without notice or obligation. Equipment shown is for illustrative purposes only and may display optional accessories or components specific to their global region. Please contact your local Vermeer dealer for more information on machine specifications and attachments.
Vermeer, the Vermeer logo and Equipped to Do More are trademarks of Vermeer Manufacturing Company in the U.S. and/or other countries. © 2021 Vermeer Corporation. All Rights Reserved.