Selecting the right type of drum for your trommel screen will help you better meet the needs of your customers and maximize the value of your end product. The industry offers two configurations of trommel drums — a tensioned screen drum or an auger drum. Using tensioned woven-wire screen panels allows the use of smaller gauge wire to increase the total open screen area, which helps maximize production. However, tension screens are more susceptible to material spearing and more vulnerable to heavy contaminates like large rocks and concrete.
A trommel with an auger drum separates material using tumble-and-roll action, which minimizes the chance of material spearing the screens. However, auger drums have less open surface area and are more prone to having wet material build up in the drum, and it can be more expensive to change product size due to needing an additional drum.
The tensioned screens on the Vermeer TR6450 trommel screen offer you a high degree of flexibility, allowing you to quickly change screens to adapt for changing conditions. But the trommel is also capable of running an auger drum. A unique chain-and-cog drum drive on the Vermeer TR6450 trommel screen helps ease swapping out drums.
The following step-by-step process will guide you through removing and installing the drum on the Vermeer TR6450 trommel screen. See the operator’s manual, maintenance manual and/or service manual for safety messages and further instructions.

Drum removal
You need to make sure the drum is cleaned out prior to removal. Operate the trommel screen until all material has emptied from the feed hopper, hopper conveyor, drum and all output conveyors. Once emptied, press the auto-screen button to automatically stop the drum and conveyors.
Slide the hopper out of the drum using the key and then unlatch the door. Open the drum door fully using the key.
Using the drum jog controls at the end of the drum door, rotate the drum to make a hole on the ring accessible to attach the screwed-in shackles. Then follow the shutdown procedures found in the machine’s operator’s manual to properly shut down the machine. Remove and retain the engine key, then press the engine disable switch.
Now you will prepare the drum and properly rig it for the lift. Attach the chain sling assembly with a swivel to the shackles and adjust the lengths of the chain to maintain level lifting of the drum.
Reset the engine disable switch and follow the starting procedure to start the machine. Use the drum jog controls to rotate the chain sling to the top of the drum. Each push of the switch will rotate the drum a short distance in either direction.
Now that the drum is positioned for the lift with the sling positioned at the top of the drum, follow the shutdown procedures to properly shut down the machine. Remove and retain the engine key, then press the engine disable switch.
Attach the chain sling swivel to a suitable lifting device that is rated for 8,500 pounds (3,855 kg). After setting chain leg lengths, take up the slack in the lift chain assembly.
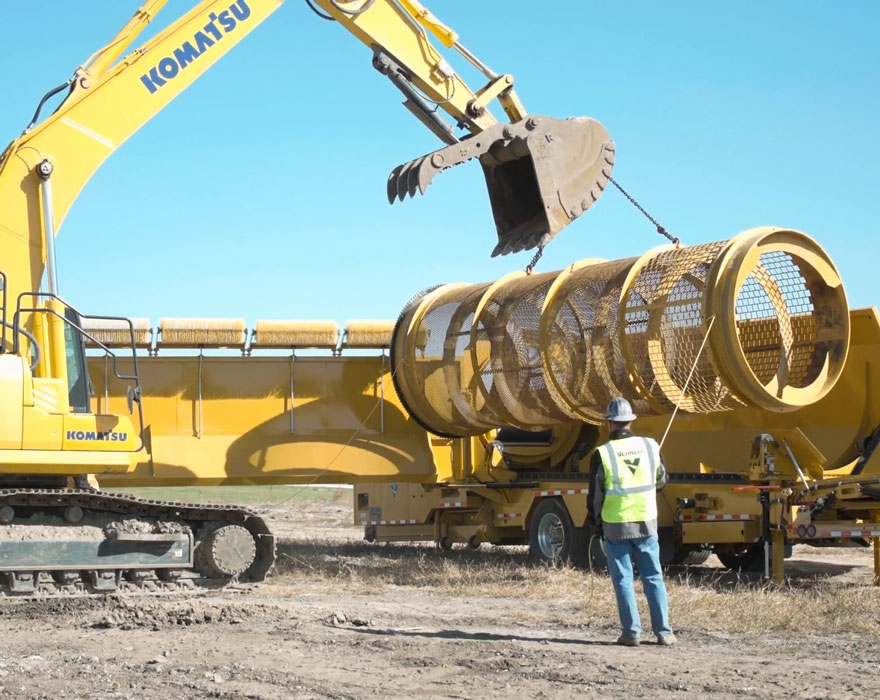
Taglines need to be used to help guide the drum during the removal process. Attach two 20-foot (6-m) long taglines, one on each end of the drum, through holes in the front and rear drum rings. Assistants should stand on each side of the drum door and use the taglines to help guide the drum out of the machine.
Lift the drum enough to clear the front and rear trunnions before moving the drum through the drum door opening. Once free of the machine, set the drum on a level surface and block both sides.
Drum installation
When it is time to re-install a drum in a Vermeer TR6450 trommel screen, you must start by properly rigging a sling to lift the drum into place. Rotate the drum so you can access a hole in the trommel drum ring to attach the screw pin shackles to the drum. Attach the chain sling assembly with a swivel to the shackles and adjust the lengths of the chain to maintain level lifting of the drum. Attach the chain sling swivel to a suitable lifting device rated for 8,500 pounds (3,855 kg).
It is now time to make the lift. After setting chain leg lengths, take up the slack in the lift chain assembly.
The drum will be guided into position by tag lines during the installation process. Attach two 20-foot (6-m) long tag lines, one on each end of the drum, through holes in the front and rear drum rings. Assistants should stand on each side of the drum door and use the tag lines to help guide the drum into the machine. Lift the drum enough to clear the front and rear trunnions before moving the drum through the drum door opening. As the drum is lowered into position, be sure the two rear rings on the drum straddle the thrust bearing and the drum sits squarely on the front and rear trunnions.
Before attempting to operate, check the alignment of the drum drive sprocket and make any adjustments as needed. Refer to your machine’s operator’s manual and then you can restart the engine and use the jog controls to rotate the drum to gain access to the shackles.
Before removing the shackles, make sure the machine is properly locked out. Follow the shutdown procedures to properly shut down the machine and remove the engine key. Then press the engine disable switch.
It is now time to remove the shackles and disconnect the lifting chain.
Finally, reset the engine disable switch and start the engine using the starting procedure. Close the door and latch it securely. Move the hopper into the drum and you are ready to resume operation.
The unique design of the Vermeer TR6450 trommel screen makes drum changes less of a hassle.
For more information about trommel screens, contact your local Vermeer dealer today.
Vermeer Corporation reserves the right to make changes in product engineering, design and specifications; add improvements; or discontinue manufacturing or distribution at any time without notice or obligation. Equipment shown is for illustrative purposes only and may display optional accessories or components specific to their global region. Please contact your local Vermeer dealer for more information on machine specifications.
Vermeer and the Vermeer logo are trademarks of Vermeer Manufacturing Company in the U.S. and/or other countries. © 2022 Vermeer Corporation. All Rights Reserved.
