Installing the cables that deliver broadband internet
According to the National Telecommunications and Information Administration (NTIA), the Infrastructure Investment and Jobs Act (IIJA) passed by Congress commits $65 billion toward broadband expansion. NTIA established the Broadband Equity, Access and Deployment (BEAD) Program to manage $42.25 billion of that allocation and committed a minimum of $100 million per state. So, as utility contractors wrestle with their current workloads, there doesn’t look to be any slowdown in fiber work for the foreseeable future.
Of course, the promise of ample opportunities doesn’t ensure success; it just means there are plenty of opportunities for qualified, well-managed companies. To capitalize, you must make sure your crews are working as efficiently as possible on every project.
To help with that, here’s a breakdown of all the steps you should follow when installing and making fiber connections.
1. Project bidding and bore planning
There is enough that can be said about project bidding and planning to devote a separate step for each of them. Here are some things you need to consider before bidding and starting a job.
- Ground conditions: One of the first things you need to determine is the environment you’ll be drilling in. Rock and dense clays can take more effort to drill than loamy soils and sands. However, every type of ground condition has its own unique set of challenges. Just be sure you understand what those are ahead of time.
- Location: You also need to scope out where you’re drilling — residential neighborhoods, downtown in a busy city or a rural area.
- In residential areas, you’ll likely be asked to perform shorter shots, and more restoration work will be required.
- When drilling near busy highways or in a downtown area, you may be required to close lanes of traffic and/or adjust your working hours.
- In rural areas, you can expect bores to be longer and likely tie in with lines that have been plowed or trenched in.
- Above and below ground obstacles: Of course, you know calling in locates (OneCall/811 in North America) is required before any digging happens on a project. During the bidding and planning process, it’s always a good idea to walk the area to get a sense of what may be underground near the proposed bore path. You will also get a sense of what obstacles exist above ground since those may impact the distances of each bore.
With all those things in mind as you consider the scope of a project and walk the bore path, bring along a locator with GPS or a smartphone with an app like Vermeer Projects installed to get a sense of bore distances and mark any potential obstacles. Doing this will help every other phase of the process go more smoothly.
2. Locating and verifying
Before that first rod can be thrust into the ground, you must have the location of buried public water, gas, electric, sewer and other utility lines marked. However, many homeowners may also have private lines that run under their properties that utility companies are not responsible for or aware of. So, you’ll need to reach out to property owners regarding other underground infrastructure you may encounter.
It’s also a good idea to check the work of the companies/individuals marking lines by investing in your own utility-locating equipment, like the Vermeer Verifier® G3 utility locator. While this may feel like an extra step, it can help save time and expenses if your crew runs into a situation where a locate was missed or not properly marked. This can happen in residential areas where homeowners may be running electrical lines to power an external building or outdoor lighting.
Now, it’s time to walk the bore path again, paying close attention to where the anticipated path will cross or be near an existing line. Those areas must be exposed (daylighted/potholed) to visually confirm the exact location and depth of the existing line. Keep in mind that some buried lines may be positioned one on top of each other, so it’s a good idea to excavate on all sides of the utility to verify there isn’t something underneath the first line you unearth.
Potholing existing utilities must be done with care; you do not want to end up damaging any lines in the process. This is why using vacuum excavation instead of a backhoe, shovel or mini excavator is ideal. Vacuum excavators use high-pressure water or air to break up the ground and powerful vacuum suction to dig. This combination minimizes the risk of damaging existing underground lines.
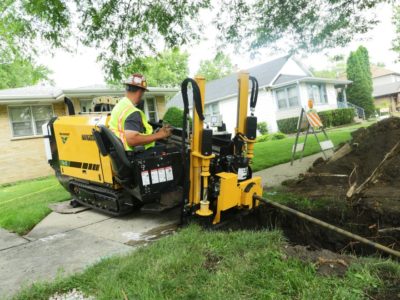
3. Installing fiber conduit
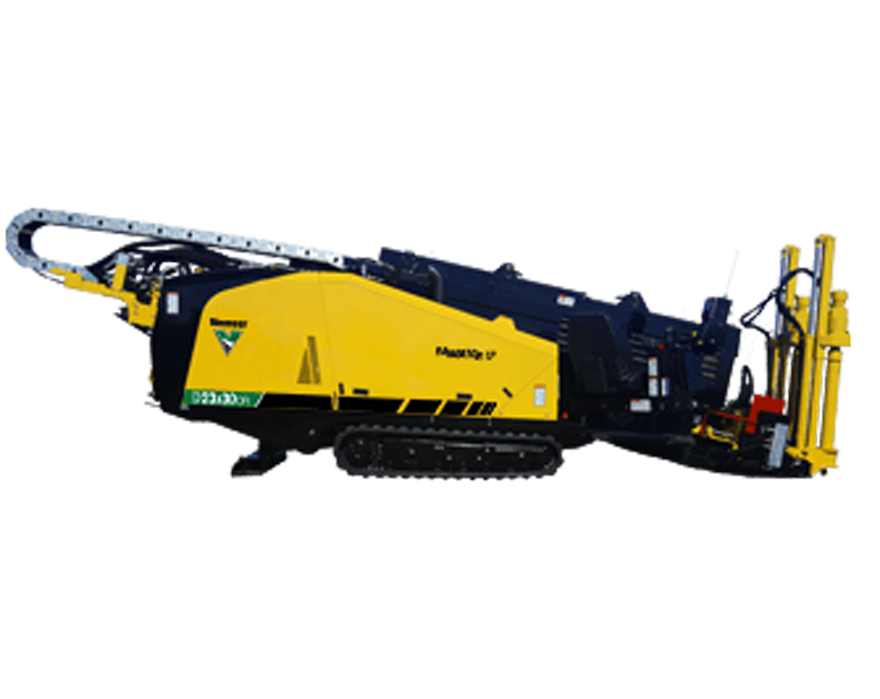
When all your planning and prep work is complete, it’s time to bring in the drill. Choosing an appropriately-sized horizontal directional drill (HDD) for the area will help your crew work as efficiently as possible and help minimize restoration work. For example, if you’re doing shorter bore shots, smaller drills like a Vermeer D8x12 or D10x15 S3 horizontal directional drills should be considered because of their compact sizes and short drill rods for flexible steering. For residential/urban work, you may want to consider drills like the D20x22 S3 and D23x30 S3. These units are popular for contractors that average around 300 feet (91.4 m) per drill shot. Challenging ground conditions and/or longer bores will require more power, so you may want to step up to a D24x40 S3 drill. Finally, if you’re working in rocky grounds, choosing a dual-rod machine like the Vermeer D23x30DR S3 drill may be your best choice.
You also need to match your drill bit and drilling fluid mixture for the ground conditions. You can read more on that in the article “Tips for pairing the right tooling and mud mixtures.”
With those details determined, it’s time to get drilling. Using the plan created in step 1 as a guide for your crew should help them identify the exact entry and exit points for each bore. In some cases, they may have to tie into existing manholes or handholes, or add utility boxes along the way. If this is the case, they will need to be mindful of where these new boxes need to be located and to what depth they need to be dug.
After the pilot bore is complete, it may be time to ream or pullback conduit depending on the bundle size your crew is working with and the type of ground conditions. If reaming is required, be sure to check out tooling like the Vermeer Ultra X3 Drilling System. This non-torqued spline connection system can save time when swapping out tooling and can ream directly from the transmitter housing.
Before pulling back the conduit, be sure you know how the fiber will eventually be threaded through the line, even if you’re not responsible for that phase of the job. Note: HDD is the focus of this article, but there are many ways of installing fiber, including direct bury. Get a better overview in the article “The many ways to install fiber.”
4. Threading fiber and splicing cables
Utility companies use conduit instead of directly installing fiber lines in the ground because the conduit provides protection from shifting ground conditions, rodents and potential damage caused by hard digging methods (shovels). Conduit also allows old lines to be more efficiently upgraded or replaced in the future.
Depending on the distance of the drill shots, fiber is either pulled or pushed (blown) through the new conduit. As mentioned above, most companies will pull fiber lines over short distances because the process requires minimal equipment — just a winch line.
Over longer distances, though, blowing or cable-jetting fiber through the conduit is a more efficient way of doing the work. This method injects compressed air into the duct inlet to propel the fiber cable through at high speed.
Once the fiber is installed, it’s time to splice the fiber cables together. If your team is responsible for this step, make sure everyone understands what PPE is required during this phase.
In addition to connecting each section of the main fiber lines, you must splice lines every time you complete a fiber drop to a home or business.
5. Restoration
The final step is putting everything back as you found it. Every hole dug and area disturbed by equipment activity needs to be restored. This may mean bringing in dirt, grass seed or sod. In some places, you may need to pour concrete or regrout concrete cores drilled while potholing existing utilities. While this step feels like an afterthought, the quality of your work in this area will leave a lasting impression on your customers’ customers. If the utility company or city gets complaints about the condition you left the site in, you likely won’t be their first choice for future work. So, do a good job.
Restoration tip: This part of the job can feel labor-intensive, so many utility contractors employ mini skid steers to help expedite the work. These compact loaders can be outfitted with ground-engaging attachments like Harley rakes, soil renovators and land levelers to help with restoration work, and buckets and forks for loading/unloading material.
Need help
The fiber market is booming, and there are plenty of opportunities out there for qualified contractors willing to do the work. If that contractor is you and you’re looking to maximize your team’s productivity, be sure to consult with your local Vermeer dealer. They can connect you with equipment and tools to get projects done efficiently. They can also help with training new crew members. Give them a call or stop by to learn more.
Vermeer Corporation reserves the right to make changes in engineering, design and specifications; add improvements; or discontinue manufacturing at any time without notice or obligation. Equipment shown is for illustrative purposes only and may display optional accessories or components specific to their global region. Please contact your local Vermeer dealer for more information on machine specifications.
Vermeer, the Vermeer logo and Verifier are trademarks of Vermeer Manufacturing Company in the U.S. and/or other countries. © 2022 Vermeer Corporation. All Rights Reserved.