The demand for horizontal directional drilling (HDD) projects is growing every year. But if you’re not reclaiming fluids, you may be seriously impacting jobsite productivity and your ability to compete effectively.
The right mud recycling system can prove invaluable on your directional drilling site, particularly if you operate in areas with high dump fees, long distances to and from the dumpsite, in highly regulated areas or where water is scarce. Vermeer reclaimers reduce the amount of drilling fluid additives and the amount of fresh water required to complete installations.
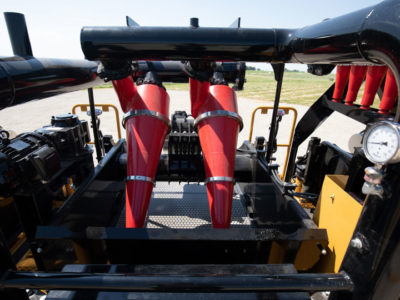
Drill cuttings and dirty fluid are pumped to the mud recycling system. This slurry flows across the shaker decks, which separate the larger cuttings from the directional drilling fluid. Remaining cuttings are removed from the dirty fluid with the desander cones that remove sand and desilter cones that remove silt. After the entire process is complete, recycled fluid is returned to a clean tank. This allows you to spend less time hauling water and transporting materials to disposal sites.
For large-scale drilling operations, you need to make sure your equipment is properly sized. The Vermeer R600T reclaimer has been designed for large-scale directional drilling projects with high-volume needs. It features a linear-motion shaker deck that helps maximize the available G-force and extends the expected screen life.
Proper shaker deck setup tips for your mud recycling system
Correctly setting up the shaker deck will help you maximize the productivity of your R600T. Refer to your machine’s operator’s manual for safety messages and further instructions.
Once the reclaimer is staged onsite, the tanks are filled with water and the unit is ready to be used. “It’s important that the shaker decks are set up properly to achieve maximum performance,” said Vermeer pipeline applications specialist Marv Klein.
With the R600T, start by detaching the transport support bars from the sides of the shaker deck. “These support bars are designed to carry the load of the shaker decks during transport but need to be detached from the shaker decks prior to use,” said Klein.
After the transport bars are detached, the next step is to check the air pressure in the airbag to check for proper inflation, which will allow the shaker decks to operate at maximum efficiency. The recommended air pressure is between 40 psi and 50 psi (275.8 kPa and 344.7 kPa), which can be verified with a standard air pressure gauge.
Install the screens
Each shaker deck on the R600T is equipped with three pre-tension screens.
Select the most appropriate screen that matches your jobsite conditions, including flow rate and fluid concentration. Once the proper screen selection is decided, you can begin the installation. “Always check the backside of the screen to make sure the rubber gaskets are in place and there is no damage to the gasket,” advised Klein.
The first screen to be installed goes into position Number 1, which is toward the back of the shaker deck. To install the screen, position it inside the shaker deck between the sidewalls and slide the screen all the way back against the end wall.
To secure the screen in place, place one of the screen wedge bars on top of the screen frames on both sides. Then position a screen locking wedge on top of the screen wedge bar and slide them under the retainer by pushing down on the screen and pushing the wedge under the retainer until snug. Using a pry bar, pry the wedges under the retainer until the wedges are tight and secure.
Repeat the installation process for screen positions Number 2 and 3 until all shaker decks are completed.
Set the motor counterweights
For the shaker deck to achieve maximum performance, it’s critical that the counterweights on the shaker deck motors are set to the proper setting. To check the settings and adjust the counterweights, always refer to and follow the instructions in your machine’s operators and maintenance manual.
The counterweights are located under the motor end caps. The end caps will need to be removed. The two counterweights should be offset; the numbers on the ruler located on the flat edge of one of the counterweights will indicate the weight setting. The minimum operating weight setting is 70%, but it can be adjusted up to 100% to help optimize shaker performance.
“When the weights are fully overlapped, the percentage is 100%, and when the weights are not overlapped and totally opposite to each other, the percentage is zero,” explained Klein.
To adjust the weight setting, loosen the Allen head bolt on the counterweight with the ruler and rotate the counterweight to the desired setting. Always make sure you re-tighten the Allen head bolt to the proper torque specified in the manual. “Always set both sets of weights on the motors to the same setting,” advised Klein. Replace the motor end caps and secure in place with the four retaining nuts and bolts.
Set the deck angle
The last step is to set the shaker deck angle. Although there’s no specific set working angle, it’s advised to start with an upward angle from back to front. The proper working angle can be set by adjusting the angle using the two jacks mounted on each side of the shaker deck. Crank the jacks clockwise to increase the angle and counterclockwise to decrease the angle until the desired angle is achieved. “We suggest that you run at the lowest angle possible,” said Klein.
A flexible solution for mud recycling
The R600T can pair with maxi rigs pumping between 300 gpm and 600 gpm (1,135.6 L/min and 2,271.3 L/min). The reclaimer has a total fluid capacity of 7,729 gal (29,257 L) and can process 1,100 gpm (4,163.9 L/min) of drilling slurry for a true cleaning capacity suited for HDD projects in the 600-gpm (2,271.2-L/min) range.
You also have the flexibility to choose your own power source for the R600T. You can configure the reclaimer with an onboard generator set or connect it to another power source already being used on the job.
For more information on the R600T, contact your local Vermeer dealer.
Vermeer Corporation reserves the right to make changes in product engineering, design and specifications; add improvements; or discontinue manufacturing or distribution at any time without notice or obligation. Equipment shown is for illustrative purposes only and may display optional accessories or components specific to their global region. Please contact your local Vermeer dealer for more information on machine specifications.
Vermeer and the Vermeer logo are trademarks of Vermeer Manufacturing Company in the U.S. and/or other countries. © 2022 Vermeer Corporation. All Rights Reserved.